Friday 23 December 2011

Season's Greetings!

This will be my last post before Christmas so I wanted to take this opportunity to wish all my followers and visitors to my blog a Very Merry Christmas and a Happy, Healthy and Peaceful New Year, and to say a big thank you for all the kind comments and support you have given me this past twelve months.

I have two cards to show you again today, the first one is my Christmas Card to each and every one of you.

Image TEDDYBOBEA_094 - Coloured in Photoshop
Papers - Simply Christmas papers 4 - Clipart Fairy
Ribbon - MeiFlower
Wording is computer generated, and the banner makes this image so versatile as just by changing the wording it would be suitable for so many occasions.

My second card uses one of the new D'Arcy's Diaries images.

OPENS THURSDAY 12th JANUARY 2012


Post this on your blog with a link back to the D'Arcy's Diaries blog for a chance to win a £15 voucher to be spent in either Teddy Bo & CoThe FairyD storeWonderland Stamps or D'Arcy's Diaries.

D'Arcy isn't really into the whole Christmas thing, even with her Christmassy clothes and hair, that's why her little heart says Humbug!

Image - FAIRYD_DD_002 coloured in Photoshop
Papers - Harlequin Book a easel kit - Clipart Fairy
Ribbon - MeiFlower
Martha Stewart border punch.
Wings have been 3D'ed and along with the heart
have been coated in Glossy Accents

Once again I hope you all have a fabulous Christmas, and that Santa brings you everything on your list. See you in the New Year when we have lots of exciting things coming up, including Teddy Bo's first birthday (10th January) and of course the D'Arcy's Diaries launch.

I may be back before then though if I get lots of crafting goodies off Santa as I will have to try them all out, won't I ?!?!?!?!!!

Hugs
Colette xx

Thursday 22 December 2011

Clipart Fairy Little Beauty

As promised on Sunday I have a pretty little birthday card to show you, made using the Little Beauty Paper pack and one of the Little Birthday Beauties images from the Clipart Fairy. The paper pack contains 32 gorgeous papers made especially to co-ordinate with the images, but they don't have any particular theme to them, there is a mixure of dots, stripes, checks and floral which makes them very versatile and perfect for any girly cards. The image pack contains 6 little girl graphics, so plenty of card design options with the two kits combined.

 I have used a plain paper from the pack printed onto A4 card for my card base, then matted and layered different papers, some with double sided tape, some with foam pads, to add some dimension to the card. 
Scalloped Frame - X-cut Die-licious dies
Sentiment shape - Memory Box Woven circle die
Charm, Polka dot ribbon and gems - MeiFlower

The Clipart Fairy also has a new CD coming out in the New Year, and to give you a taste of what's on it she is giving away a fab freebie over on her blog, a complete shaper set and matching alphabet, just pop over here if you want to snag it for yourself.

How are your Christmas preparations going? I just need to finishing wrapping a couple of pressies and get to the local farm shop for my potatoes and  veggies and I am just about ready for Christmas, I don't know about it being the most wonderful time of the year, I think it is definitely the most stressful time of the year LOL!

Tuesday 20 December 2011

When is Teddy Bo Tuesday not Teddy Bo Tuesday?.......

.....when FairyD, Teddy Bo's creator decides to come up with a fantastic new character for the girls on the DT to play with.

There are still a couple of Teddy Bo new releases this week, Bo and Bea with braces (how strange does Bea look with a mouth), and holding a banner (this one will be turning up on my blog later in the week)....

 .....but in the New Year there will be a new young lady for you all to play with, she is called D'arcy, and she is just adorable, you are going to luuuuuuurve her!

She will be available to all from 12th January 2012

I have made two cards today using one of the D'arcy images, just to whet your appetite, and if you pop over to the Teddy Bo Challenge Blog you will get to see the rest of the images, as the design team have all fallen in love with her and most have used her for their cards this week.


Image - FAIRYD_TB_GIRL_03
Papers - Sweet Candy - Clipart Fairy
Heart Die - X Cut Die-licious Dies
Heart and Key Die - Spellbinders
Ribbon and pearls - MeiFlower

I am entering this card into these challenges

Bunny Zoe's Crafts -Fancy Folds/Shaped Card
Make it Monday - always Anything Goes
Corrosive Challenges -Anything BUT Christmas
 Wags 'n Whiskers  – Fancy Folds
~~~~~~~~~~~~~~~~~~~~~~~


Image - FAIRYD_TB_GIRL_03
Papers - Sweet Candy - Clipart Fairy
Die - Nellie Snellen
Charms, gems, ribbon, silver cord - MeiFlower

What do you think, isn't she fabulous?!!!

I am entering this card into the following challenges
One Stitch At A Time -Anything Goes
Sparkles Forum - Anything BUT a Christmas Card 
The Crafty Pad - Anything But Christmas 
Delightful Challenges -- Anything Goes
Southern Girls -  Lets Celebrate (anything) 


This week we have the final winners of the Teddy Bo Tombola,
thank you to everyone who played along, I hope those of you that won 
prizes were pleased with what you got.
Today's names were drawn by my hubby as Meg is in respite this week.


Congratulations Hazel and Chrissy who were drawn as the winners of this weeks tombola, and NannieFlash and Dawn Louise whose names were drawn out to receive one of the unclaimed prizes from previous weeks.
Ladies if you could all contact me with your address details (my email address is in my profile and please put Tombola in the subject line) I will get your prizes posted out to you next week after the Christmas rush.

There is still plenty of time to enter the current Teddy Bo Challenge - Birthstone Colours - as it runs until 
Midnight Sunday 8th January 2012.

Sunday 18 December 2011

Clipart Fairy Retirement!

No I am not announcing the retirement of the Clipart Fairy, I have two retirement cards to show you made using Clipart Fairy kits, you can breathe a sigh of relief all you Clipart Fairy fans LOL!

I have a male and female retirement card in an Art Deco style. In both cases I have used the printables kit with extra paper from a different kit in each set.

The topper on this card is from the Retired Lady 1 printable. The frame, wording and image print out onto A4 card, which should then be scored down the left hand side of the frame, folded and then cut through both layers to make a stand alone card, (the shawl has a couple of layers of decoupage) but I cut the frame and image out and attached it to an easel card using matching papers from Retired Lady 1 Parts.
The jewelled brads I found in my stash, they are by Dovecraft, I think I picked them up at one of the shows and the feathers are also from my stash. There is quite a liberal helping of Glamour dust on the card too, but it doesn't show up in the photo.


The background and topper for this card came from the Man in a Hat topper Retirement and Birthday kit, along with a stripy paper I used on the inside, the red paper comes from Man In a Hat and Jacket Birthday  Toppers kit. I used it to cut out a rectangle larger than the topper, attach the topper with foam pads and then trim the corners to the same shape as the topper. The pocket watch is a Spell binders die, the grosgrain ribbon and brads are from MeiFlower and I used a gold peel off for the chain.

I will be back later in the week with another Clipart Fairy card, a birthday card using Little Beauties paper and one of the Little Birthday Beauties Images 

Also just a quick heads up to let you know that MeiFlower have 25% off their Satin Ribbons,
just enter code RIBBON25 at the checkout.

Friday 16 December 2011

Polkadoodles Through the Window challenge

Daniele has chosen this week's theme for the last Polkadoodles challenge of 2011 which is
Looking Through the Window
and she wants you to use a window cut out or aperture to peer through to the scene outside (which is on the inside of the card).


For my window card I have used images and a paper from the Magical Winter CD's The window section of the card is (once again) bowed out and I used a Martha Stewart border punch to make my window frame. I added glitter to the holly berries and glossy accents to the bow. The lamp-post is a Marianne Creatables die.


In this pic I have tried to show how the front of the card arches away from the background.

Pop over to the Polkadoodles challenge blog and check out the rest of my teamies fabulous creations.

You have until Sunday 25th December (Christmas day woohoo!) Noon GMT to get your challenge entries in.

Monday 12 December 2011

Teddy Bo Tuesday Birthstone Colours

We have our last challenge of 2011 over on the Teddy Bo Challenge blog this week, the Design Team will be taking a break until 10th January, when we will be back with a huge celebration for Teddy Bo's first birthday, although you will still see things popping up over on the challenge blog, maybe a couple of new graphics and DT inspiration from a few of us.

This week's challenge is hosted by Team B,and their chosen theme is
Birthstone Colours.
I like to join in each week, whichever teams turn it is, as the new graphics are always so hard to resist.
There is a chart on the blog if you are not sure what colour your birthstone is.

I am a May baby and my birthstone is Emerald, so today I have a very green card to show you.


Image - TEDDYBOBEA_092 coloured in Photoshop
All Papers (inc Kraft) - Digi paper pack Merry and Bright by Crystal (fantastic value at only $8.44 for an amazing 132 papers in reds, blues, greens, pinks, lemons, creams, lots of Christmas patterns as well as dots, stripes, checks, plains etc.)
Ribbon and pompom - stash

The challenge will run until Sunday 8th January 2012, so plenty of time to get your birthstone colour card or project made and uploaded.


Pop over to the challenge blog and check out the fabulous creations from the DT.


.....And finally,  the Teddy Bo Tombola.
This week's winners, drawn once again by my daughter Meg are...........


Nela and Donna if you could email me (putting Tombola in the subject line) with your contact details I will get your parcels in the post (click on view my complete profile for my email address.)

This is your last chance to win one  of the Tombola prizes, so if you would like to try your luck, it's really easy, just leave your name and one of the remaining numbers in the comments section of this post.

5 or 6 
 I also have two unclaimed prizes, so after drawing the first two I will also randomly select a second two winners, who will each get one of the unclaimed prizes.
If you are not sure what the tombola is all about check out the details here.
Thanks for playing along.
Colette xx

Sunday 11 December 2011

Clipart Fairy Big Bloom and Playful Panels

Today I have two cards to show you that I have made using a couple of the Clipart Fairy's latest Kits. The same kits were used for some of the workshop cards last weekend, but I always like to see what else I can do with them.

The Big Blooms Button It kit is full of lovely vibrant colours, has 13 papers, the flower in three different colour ways, oval frames, mat and layer me base, wording and the girl graphic (which I haven't used this time) in both a frilled and unfrilled frame, as a super graphic.


I have mat and layered papers from the kit, used the checked frame as a diamond instead of square, and used a Die-Namics double scallop border die for embellishment.
I shaped and glittered the flowers and layered them up.
The flower centre is made up of a 20mm rhinestone spacer and 14mm acrylic rhinestone from the Hobby House, and I used the gorgeous Crystal AB stick on gems from MeiFlower to add lots of sparkle. I love these iridescent crystals as they pick up the colours surrounding them. 


My second card uses parts of  the Playful Panels Blue interactive kit, the RTP Playful Panels Blue kit and also a paper from the Playful Panels Classic Kit


I enlarged one of the panels to A4 size, printed, cut and folded in half to make my card base, I also printed the  same patterned paper onto the reverse of the card before cutting.
I printed a paper from the blue and one from the classic kit onto pearl paper and used a CREAlies no5 die to make my flowers.
Ribbon and pearls are from MeiFlower.

Off to do some Christmas present wrapping now, not my favourite job in the world so tends to get left until it has to be done, but as some of them need delivering later I have to get stuck in.


Friday 9 December 2011

Polkadoodles Quickie Christmas

It was my turn to pick the challenge over at Polkadoodles this week and I decided to go with
Quickie Christmas Cards
You know what it's like, you suddenly realise there is only two weeks to go to the big day and you still haven't made all your Christmas cards, (unless you're super duper organised, which I am not) so I want to see quick, simple cards, with not too many layers or embellishments, something that you can easily make a lot of in a short space of time.

 I used the trees and reindeer images from a Sundae of Seasons, layered them up in Photoshop and coloured a sky background, I then printed them straight onto card, cut, folded, added a gorgeous saddle stitch ribbon and a couple of Jingle bells, both from MeiFlower, some glitter to the trees and layered up the reindeer's head, and there you have it, my very quick card.

The Jingle Bells are coloured with Promarkers and I added glossy accents to his nose.

Check out my teamies quick Christmas inspiration over on the Polkadoodles blog and you have until Sunday 18th December Noon GMT to get your entries in.

Thursday 8 December 2011

Pop Up Box Tutorial

This week I have put together a step-by-step tutorial for my pop up box card.
If you like the look of it and fancy having a go at making one you will find the instructions over on the Teddy Bo Top Tip Tutorial Thursdays post.


If you try it out let me know and I will pop over to your blog and have a nosy!

I am entering this card into the following challenges

Incy Wincy Designs - Non Traditional Christmas Colours
Crafty Sentiments  Snowflakes
Jen's Digi Stamps - Anything but a standard card
Ladybug Crafts Ink TLT Challenge -  #49 Snowflakes & Sparkle
Digi Makeover Challenge - must use digi - Cut out your digi image

Tuesday 6 December 2011

Oh the weather outside is frightful....

......but making cards is quite delightful! and there's only one place to go, - Teddy Bo, Teddy Bo, Teddy Bo!

If it's not rain lashing against the windows, it's hailstones, it's freezing, wet and windy so the best place to be is in the craft room although I do have to venture out to do some Christmas shopping today so boots, scarf and gloves are a must have I think.

Over at Teddy Bo this week we are half way through our White Christmas challenge, and I have a card to show you made with one of this week's new images. I love this image, it would be perfect to use for a husband, a wife Mum and Dad, Sister and Brother-in-law etc., etc., etc.

I decided to make a card for my hubby, who after seeing the sentiment saying wonderful husband, asked me if I had another one tucked away somewhere as it couldn't possibly be meant for him after all the moaning I do at him LOL!

Image TEDDYBOBEA_091 coloured in Photoshop
Kraft and white cardstock
CartUs - snowflakes embossing folder
Cuttlebug - Swiss dots embossing folder
Ribbon - MeiFlower
Lace - Stash

I am entering this card into the following challenges
Creative Card Crew -  Tis The Season
Paper Take Weekly - Anything Goes
Tuesday Throwdown - #77 Celebrate The Season
Crafty Boots -  Anything Goes 
Heart Song Inspirations - Christmas and /or Red, Green, White
Make it Monday - always Anything Goes
Pollycraft - Christmas Fun
Divas by Design - #16 anything goes


Pop over to the Teddy Bo Challenge blog and check out all the fabulous creations from my teamies.
You still have until Sunday 11th December to get your entries in for our White Christmas challenge and be in with the chance of winning the Fabulous Teddy Bo 10, your choice of ten images from the Teddy Bo store including this weeks new releases, a fabulous prize for sure!


.....And finally,  the Teddy Bo Tombola.
This week's winners, drawn once again by my daughter Meg are...........


Helle and Jill if you could email me (putting Tombola in the subject line) with your contact details I will get your parcels in the post (click on view my complete profile for my email address.)

Only two more weeks of Tombola to go so if you would like to try your luck this week, then it's really easy, just leave a comment on this post containing the number you would like from the ones remaining.
1, 5, 6, 8
and if you are not sure what the tombola is all about check out the details here


Thanks for playing along and good luck!
Colette xx

Sunday 4 December 2011

Clipart Fairy Workshop

Yesterday I mentioned that I would be going to the Clipart Fairy workshop (A big hi! to Donna, Sue, Josie, Anita and Lesley!) and would have more cards to show you today and finally here they are.
I've had visitors today and this afternoon have been looking after my grandson Charlie, while his big brother has gone on a Polar Express day out at Southport Railway Station, which is why I haven't managed to post these any earlier.

1. Wedding Card and Bag
The back of front of the card are held together with concertina pieces of card, so it's three dimensional.

 An acetate fronted bag to hold the wedding card.

 2. Happy Couple Card


The man's waistcoat and ribbon are Navy Blue, but for some reason look black in the pics.

3. Fore You

 I love the bright colours in this one and the image reminds me of my hubby!, he doesn't play golf, but always has his tongue out when he is concentrating LOL!

4. Button it Flower Girl

 Another one where I love the colours, and don't you think she looks like a right little mischievous madam!

5. Wedding Day

 This one has so much going on I've had to add lots of pictures. The front flaps open to reveal the outfits and wording, on the back there is a pocket that would be suitable for a gift of money or Gift card, and it also opens like a regular card and has lovely matching inserts.

So there you have it five beautiful cards and a brilliant presentation bag.
Flowers and Metallic embellishment are from Wild Orchid Crafts, Ribbons and Gems from MeiFlower and all kits to make the cards can be purchased from The Clipart Fairy.

Saturday 3 December 2011

Clipart Fairy Quintet

As you can see by the title I have five Clipart Fairy cards to show you today, I am getting to the point of having to write out and send my Christmas cards, so need to make sure I have enough, and yesterday I managed to add these five to my total.

I have used two of the Clipart Fairy's new sets, So Macho and Christmas Fairy which both have paper packs, alphas, printables and interactive kits within them.

My first card is made with the Christmas Fairy Post It kit, I used the editable version to add my own wording to the tag, and also printed the tag out a second time so that I could make a little pocket to hold a gift of money.
Ribbon and jingle bells - MeiFlower

My second card was made using the So Macho - Mat and Layer me Kit, which contains the square background, which you could use any way up, two buntings one with the word Merry, one blank,  several word arts, oval frames, including one containing the image with decoupage, plenty of options to make lots of different cards from the one kit.


Ribbon and gems - MeiFlower

Next up is another Christmas Fairy card, using various papers, frame with image, and word art from the Christmas Fairy Kit and letters from the Sassy Fairy Alpha

Star pin - Ribbon Girl
Ribbon and Charm - MeiFlower
Beads from stash.
I like to glue a bead onto the pointy end of pins so that they don't hurt anyone.

Another So Macho card, this time I made an easel card using papers from the paper pack, the oval frame and image and blank bunting  from the Mat and Layer me kit and letters from the So Macho alpha set for the word snow.
Brads - MeiFlower
Freebie word art found here

And finally yet another Christmas Fairy card, using papers from the Christmas Fairy Kit, the Sassy Fairy Alpha and Sally the Christmas Fairy who I bought from Sassy Cheryl, as it is a good way of making the kit go further.

Ribbon and gems - MeiFlower

Now if that wasn't enough Clipart Fairy for you I am off to her workshop today, we usually make about six cards, so tomorrow you will be seeing the results of my labours.

There is a freebie Alpha and paper to collect on the Clipart Fairy blog and 25% off selected Christmas products at both the Printable and Interactive stores.
Also a 20% off everything Sale at MeiFlower which runs until Sunday 4th December.


Colette xx

Friday 2 December 2011

Polkadoodles Secret Element Christmas Card challenge

This weeks challenge theme has been chosen by Enfys and she wants to see Christmas cards for children that contain......
A Secret Element (something hidden that the child can discover)

I have made a Christmas card for my grandson Will, the bottom section of the card front is bowed out and behind the bear I have attached a little card lollipop holder and added a chocolate lollipop. I have also made up a little verse for the inside of the card to let him know there is a hidden treat. I have used images from the Beary Cold section of Magical Winter CD 2 , and added glitter to parts of the bear and some of the snow.


You can just about see the side of the lollipop tucked behind the bear.

Pop over to the Polkadoodles blog and check out the rest of the fabulous inspiration from my teamies.
You have until Sunday 11th December Noon GMT to get your entries in, we look forward to seeing what fantastic secret elements you can come up with.

Thursday 1 December 2011

Die-liciously Christmas

Today I thought I'd show you a couple more Teddy Bo cards I have made over the last week.

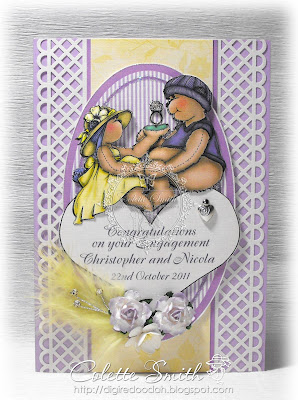
The engagement card was made for a family friend whose son and girlfriend surprised them all by announcing their engagement a couple of weeks ago. Last Saturday they had a big family dinner to celebrate and my friend wanted a special card with their names and date of the engagement. I came up with an idea of the image I would like, scribbled it down and sent it off to Gayle at Teddy Bo Towers with a begging letter, beseeching her to turn my scribble into some sort of gorgeousness.

 Here is my scribble
and here is the finished card using Gayle's fabulous image, which is available at the Teddy Bo and Co store.


TEDDYBOBEA_089 coloured in Photoshop
Papers - Gorgeous set 5 - Clipart Fairy
MS punch - deep edge garden trellis
Heart Charm - MeiFlower
Diamonte stem and feather - stash
I have added diamond stickles to the 'diamond' in the ring.

I am entering this card into the following challenges

Crafty Purple Frog -  For Someone Special
Paper Crafting Journey - Anything Goes
Make it Monday - always Anything Goes

My second card is for Fairytale Friday (I have Polkadoodle on fridays so added it today instead) and is just pure self indulgence on my part. I have loads of fabulous Memory Box dies, and I couldn't wait to use them. I have managed to sneak a couple in on some cards recently, but I was so desperate to use them that I decided to make a card and overload it with as many of my die-cut shapes as possible, and this is the result,
it's probably way over the top, but I couldn't help myself I just had to do it LOL!


Image TEDDYBEA_101 - coloured in photoshop
Background paper - Clipart Fairy -Gorgeous 3
Winterland Tree, Frosty and Frostyville border dies- Memory Box
Charm from stash.
Lots and lots of Glamour dust, you should see how it sparkles in real life!

I am entering this card into the following challenges
Partytime Tuesdays -  #44 Anything Goes
Paper Shelter Challenge -  #42 anything goes


I went to see The Saw Doctors (a fabulous Irish band that most of you have probably never heard of!) at the Liverpool Philharmonic Hall on Tuesday evening, and after all the dancing and singing, (it's the kind of concert where the whole audience sings along (badly in my case LOL!) with every song, and dances their way through the whole gig) I was totally shattered yesterday. After teaching a card class in the morning, I spent the afternoon, snuggled up on the settee watching back to back Christmas movies on the Christmas 24 channel, pure heaven!
Feeling much more relaxed and refreshed and ready to get stuck in again today, which is a good job as I have a busy few days ahead of me now.

If you want to join in with my Teddy Bo Tombola, details are on my previous post, and check out Nela's blog, as her advent calendar starts today and there will be something new added each day, including tutorials, patterns, card shapes etc., link is in side bar.