Saturday 29 October 2011

Crazy!!!

Now when I say Crazy, I'm not actually talking about myself, although there are a few people out there who would probably disagree LOL! 
Crazy is the name of a collection of printables, shapers and papers from the Clipart Fairy. I love the bright vivid colours and as well as using one of the printable kits I also wanted to do something with the papers, so today I have made two cards.


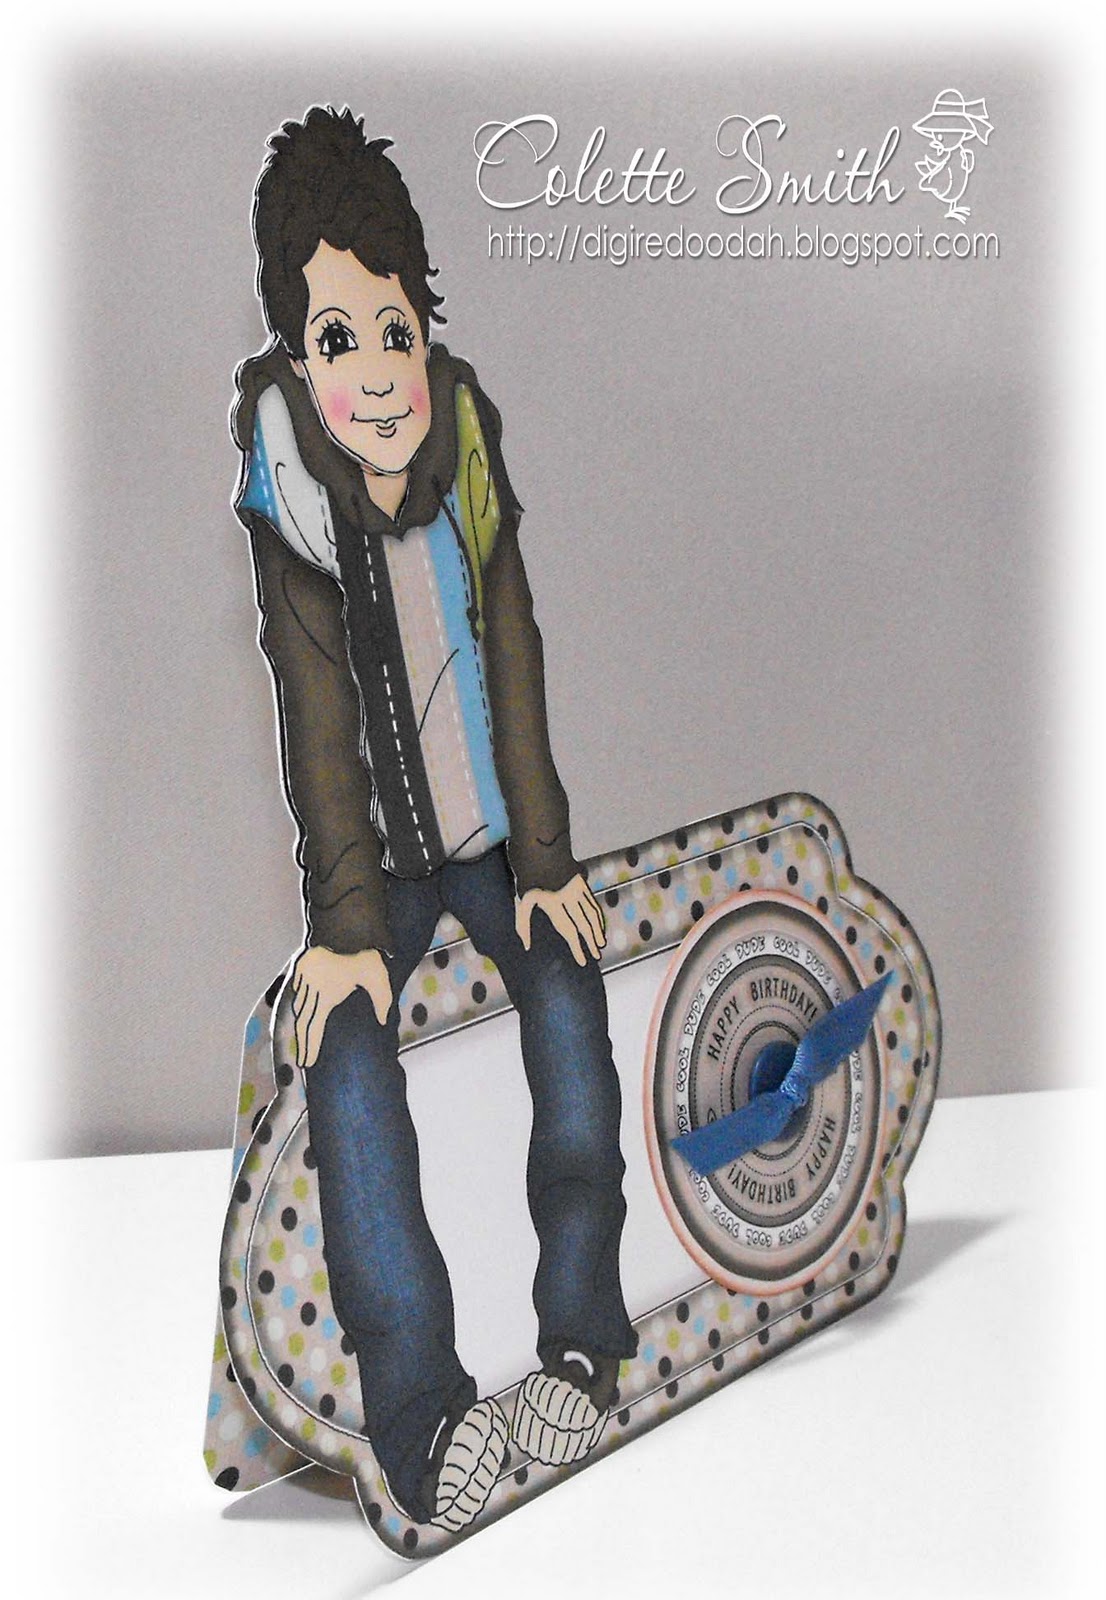
My first card is made using the Crazy Super Oval Frames Kit with bunting from the square frame kit.


I die cut some buttons from a Marianne Creatables die, covered them in glossy accents and left them to dry while I cut out and decoupaged my two oval sections. I joined the ovals together with a small piece of double sided tape at the top and a concertina of card at the bottom to hold the two sections apart.
I had to trim a small straight section across the bottom of the two ovals so that my card would stand, it's only a little amount and isn't too noticeable.
I lined up the buttons at the top, punched holes through all layers then attached the buttons to the card using different colours of wax string from MeiFlower, I added the 'happy' bunting and a computer generated birthday panel.
I reduced the size of one of the ovals in my graphics programme and added some wording to make a message panel for the back of the card.

I would like to enter this card into the following challenges

Poodles Parlour- let's hear if for the boys theme
Moving Along With The Times - No Girls Allowed
Digital Tuesday - include a digital element - #134 Buttons & Twine

~~~~~~~~~~~~~~~~~~~~~~~~~~~~~~~~~~~~~~~~~~

My second card uses the Shaper set and papers from the Crazy papers set, this set contains 23 12x12 jpeg papers for only £1.50, which I think is great value.


I printed one of the shaper sections over to the right hand side of my card, then scored down the left hand side of the shaper so that some of the edge touched the score line. I folded the card and used pegs to hold the two layers together while I cut through both layers at once.
I reduced the size of the shaper in my graphics programme and added my wording for the sentiment panel, this is attached to the card with foam pads. 
After printing various paper designs onto a sheet of paper I used MFT Die-namics dies (rolled flowers - Gardenia, Daisy and  Mum)  and Fancy Flourish and used them to decorate around the sentiment panel. There is also a bit of glamour dust sprinkled here and there and pearls from MeiFlower in the flower centres!

I would like to enter this card into these challenges


Aud Sentiments Challenge -  Make Us Laugh (sentiment)
Paper Crafting Journey - Use a Digi (everything except for pearl and glitter LOL!)
Paper Shelter Challenge - #37 Anything goes
Make it Monday - always Anything Goes

Friday 28 October 2011

Polkadoodle Stash Box Stamp Week

At Polkadoodles this week the challenge theme set by Claire is
Mystical and Magical
So we want to see your cards or projects containing an element of magic...fairies/wizard/
dragon/unicorn.

It is also stashbox stamp week, where the design team get to raid their stamp supplies and team them up with Polkadoodle products.


This week I would like to say a big Thank You to my fellow teamie Ruth for the gorgeous Charmed Delectable Holly Pixie stamped image (no longer available). I have coloured her in with Promarkers (unfortunately I don't have a large supply and didn't have a shade of green suitable for holly, so please forgive her un-holly like colour). I added glitter to her furry and frilly bits and the berries on her headband. The papers are from A Sundae of Seasons, and I've added some faux stitching around the edges. The die is Nellie Snellen Multiframe Dots Circle covered in red and green gems from MeiFlower, the red and green satin ribbons are also available at MeiFlower.


Don't forget to head over to the Polkadoodles challenge blog and check out the rest of the fabulous design team inspiration. You have until Sunday 6th November Noon GMT to show us your fantastical creations. Looking forward to seeing what you come up with.


I am entering my card into the following challenges


Charisma Cardz - Anything Goes
Crimbo Crackers - must be Christmas - Anything Goes
Digi Doodle Shop's Best - Anything Goes
Meljens Designs - Christmas
Scrapbook Sisters - #58 Anything Goes
Crafts 4 Eternity Recipe Challenge -  magical mystical theme

Tuesday 25 October 2011

Teddy Bo Tuesday and Tombola!

We are still doing Clean and Simple over at Teddy Bo, so you have until Sunday 30th October midnight GMT to get your entries in, we already have some fabulous CAS entries, you can check them out in the sidebar of the Teddy Bo Challenge blog if you need some inspiration.

I have used one of this week's new releases for today's card. It comes in two version, one with Santa and one without, I have used the other version on a card that will be posted over on the Fairy Tale Friday post this week.

Image used - TeddyBoBea_081, coloured in Photoshop
MS border punch - Layered Arches
Ribbon - MeiFlower
Font - Bingo Stars - DaFont.com


Check out the fabulous new releases in store this week!


~~~~~~~~~~~~~~~~~~~~~~~~~~~~~~~~~~~~~~~~~~~~~~~~~~
Teddy Bo Tombola

Starting from today and for the next eight weeks I will be holding a Teddy Bo Tombola on my blog.
I have 16 packages, wrapped and then randomly numbered by my grandson Will between 1 and 16, each package contains two items. In each one there will be a Christmas tree ornament, 9 of them will also have a Teddy Bo Key fob, 2 will have a pack of Teddy Bo playing cards, 3 will have a Teddy Bo watch, 1 will have a bookmark and 1 an umbrella.


To enter the tombola just leave a comment on this post along with a number between 1 and 16.
On Monday 31st October around 3pm GMT two names will be drawn and they will receive the parcel that corresponds with their number. If they both have the same number - the first one drawn will win that prize and the second one will be asked to pick another number. Each Tuesday I will list the winners and remaining numbers and we will start again.

~~~~~~~~~~~~~~~~~~~~~~~~~~~~~~~~~~~~~~~~~~~~~~~~~~

Pop over to the Teddy Bo Challenge blog to see the rest of my teamies wonderful CAS inspiration.


I am entering my CAS card into the following challenges

Forever Friends - must include animal - Anything Goes (+DT Call)
Make it Monday - always Anything Goes
Little Claire's   - #14 Christmas
Crafty Ann's - clean and simple

Sunday 23 October 2011

Clipart Fairy October Workshop

I told you yesterday that I was off to the Clipart Fairy's workshop, well here are the seven cards we made yesterday, I must warn you though, there are lots of photos.

The kits to make all these cards will be available as printables here and interactive here.

Large square card with removable tag inside and embossed panel on front.


 Large square card, with window. 
 Concertina panel at bottom between window layer and panel, holds the window away from the back slightly.


 Happy Man with bunting, message continues onto card insert.


 Happy man Over the Top card, the class sample had the topper straight, but the girls
on my table preferred it at a jaunty angle.

 Cute Get Well card
 Another with a concertina panel to slightly separate the top layers.

 Shaper Easel card using Nature's Guide Collection
 Side view

 Nature's guide Post It card, the tag slides into a specially marked slot on the front.

All pearls, gems and ribbons from MeiFlower, flowers, pin and ribbon slider are from Wild Orchid Crafts.

Another busy but very enjoyable day. Looking forward to the December workshop.

Saturday 22 October 2011

Art Deco Christmas

It's a busy day for me today, off to a Clipart Fairy Workshop, (unless my daughter has gone into labour, no signs yet though), we usually make at least six cards in the six hours we are there, which hopefully I will be able to show you tomorrow.

Today I have a card made using Over The Top - Lady in Red from the Printable store. It comes as a birthday card, but there is an editable sheet so that you can add your own wording, so I decided to make a Christmas card. The kit costs £1.00 and for that you get 5 12x12 jpeg background papers, the topper both with and without wording in jpeg and pdf versions and the decoupage layers again in both file formats.


I used some of the background papers to make my arched card, which is slightly narrower than the topper, so that when the topper is attached it bows out slightly from the front of the card, (couldn't get a decent picture of this). I used Eccentric Font, to add my greeting to the editable topper, The large snowflake is from the Spellbinders Shapeabilities - Ironwork Motifs set, with one of the dies from Create-a-Flake 3 in the centre, the smaller snowflake is also made from this set. I sprayed the snowflakes with spray adhesive and them glittered them using glamour dust and silver glitter, I also used a little red and black glitter, so it's very sparkly. The black and clear crystals are from MeiFlower and the feathers came from an old hair clip of my daughters.


I was hoping this would show the topper standing proud of the front, but you can't really tell, you can see a bit of inside though which is decorated to match.

A close up of the Ironworks Motif, all glittered up.

If you like Art Deco cards, then there is a fab selection here in the printable store, why not pop over and have a look!

I should be back tomorrow with the workshop cards, unless my daughter goes into labour LOL! you'll be sick of hearing that soon!

I am going to enter this card into the following challenges

Inspire Me Fridays - always anything goes
Paper Play  – Use Black
Shelly's Images -  Anything Goes
Paper Pretties -  Black, white, and one other colour
Tuesday Throwdown -#71 Shaped Card
KB Cute Monday - Anything Goes
Make it Monday - always Anything Goes

Friday 21 October 2011

Polkadoodle Halloween Freebie and Giveaway.

Another Friday, another Polkadoodle challenge and this time with added extras. The winning entry of this week's magical spooky challenge will win a copy of the fabulous Sundae of Seasons CD - over 4000 images to play with! and on top of that there is a fab freebie over on the Polkadoodles blog to use for the challenge.

So this week's challenge, is, quite simply, to make something for Halloween, BUT you MUST use some element from the special download here to make your project OR you can use elements from the Polkadoodles Sundae of Seasons CD too if you prefer.


I have used the cute little witch and halloween word art from the freebie download, along with papers from the Wonderland Paper Adventure CD. I have coloured the little witch digitally in Photoshop. The frames are cut with  X-Cut Large Bookplate dies, and the borders are Spellbinders Ironworks Accents, I have used the waste left over after cutting the centre borders to make the top and bottom borders. The black metallic cord and green and purple gems are from MeiFlower.


Go check out the fantastic inspiration from the rest of the design team and collect the freebie download, and don't forget you have until Sunday 30th October Noon GMT to get your entries in.

I am entering my card into the following challenges

Delightful Challenges - Halloween
Digi Doodle Shop's Best  - Green and Purple
Crafting for all Seasons - #12 Halloween
I Brake For Challenges - Halloween
Digital Tuesday - include a digital element - #133 Happy Halloween
Crafty Boots - Autumn or Halloween
Magical Mondays - mystical/fantasy image -  Halloween 

Tuesday 18 October 2011

Teddy Bo Tuesday - Clean and Simple

For the next fortnight the challenge over on the Teddy Bo challenge blog is
Clean and Simple
which is not really something I do very often, a card never looks finished to me unless there are layers and patterns and lots of embellishments, although sometimes it is easy to overdo them (which I probably do regularly LOL!). 

This is my second attempt at this week's challenge as I thought my first effort was a bit too fussy, I only hope that it fits the challenge as this is as clean and simple as I get LOL!


I have used the gorgeous TEDDYBOBEA_079 coloured in Photoshop.
The small amount of green paper down the side is from The Clipart Fairy Gorgeous 5 set.
The ribbon and charm are from MeiFlower,
I have also used the Martha Stewart Layered arches border punch
The ticket I made myself using a freebie sentiment from Create with TLC.


Pop over to the Teddy Bo Challenge Blog and check out all the fabulous inspiration from the rest of my teamies, and don't forget you have until Sunday 30th October midnight GMT to get your entries in.
The winner gets to choose ten wonderful Teddy Bo and Co images of their choice, a fabulous prize and well worth winning!

I am entering this card into the following challenges
KB Cute Monday - Anything Goes
Make it Monday - always Anything Goes
Nettie G's Digital Gems - Anything BUT a Rectangle
Inspire Me Fridays - always anything goes
Jellypark Challenges  - Add pink & ribbon for Breast Cancer


Saturday 15 October 2011

It must be Love!

Today I have a card to show you using Gorgeous Papers from the Clipart Fairy, I love these papers, they are exactly as it says on the packet - Gorgeous! LOL!, mind you her Yummy papers have a perfect name too as they are definitely Yummy.

I also have a bit of news, I have been asked by Mei of MeiFlower Crafts if I would like to join her design team and how could I refuse, after all she sells all my favourite things, pearls, ribbons, sparkle and bling! LOL! what more could a girl want.

Anway here's my card, I thought it would be perfect for an anniversary or wedding.


No images today, just papers, die cuts and bling! Every paper I have used comes from the Gorgeous papers 4 collection 16 papers foronly £1.50 bargain! I printed one straight onto the base card to give it a slightly pale pinky white colour and printed all the others out as two different patterns or shades to an A4 sheet. I have also used a Martha Stewart border punch, a couple of the dies from Nellie Snellen's Multi Frame Heart set, and LOVE a Tim Holtz shakers and movers die. The ribbon, and AB crystals around the edge of the heart are from MeiFlower.

Meg is in respite for the weekend, so I am going out for lunch with my wonderful husband today, it's so lovely to be able to have a bit of time to ourselves, I'm looking forward to a nice relaxing weekend.

I will be entering this card into the following challenges.

Inspire Me Fridays - always anything goes
Jellypark Challenges- Add pink & ribbon for Breast Cancer
Raise The Bar - In the Pink for Breast Cancer
Tuesday Throwdown -#70 Think Pink
Make it Monday - always Anything Goes

Friday 14 October 2011

Polkadoodles Ribbons and Bows Challenge

This week the challenge over at Polkadoodles has been set by Emma and she wants to see cards or projects
containing Ribbons and Bows.

For my card this week I have once again used the Pretty Sweet CD, the papers and images are just soooooo hard to resist! The flowers are made from punches, the ribbon is narrow silk ribbon from stash, which is curled and held in place with little gems from MeiFlower

 The flowers and ribbons are arranged so that they are seen through the oval opening in the front of the card, they are attached to the insert of the card.


Head over to the Polkadoodles blog and check out the rest of the fabulous DT inspiration.
You have until Sunday 23rd October Noon GMT to get your entries in.
We look forward to seeing what you create.

Tuesday 11 October 2011

Teddy Bo Tuesday

Welcome to another Teddy Bo Tuesday, we are half way through our Favourite Colours challenge, so you still have until Sunday 16th October midnight GMT to get your entries in and the winners prize is ten Teddy Bo and Co digi stamps of their choice, so what are you waiting for!

Check out the fabulous new releases in store this week.


This week I have used my favourite Male colours, Blue, Green and Brown, although if you look closely at Bo and Oliphant's hats you will noticed that my favourite lilac and turquoise have managed to creep in LOL! I have used TeddyBoBea_078, and in my imagination, these two are a little the worse for wear after a few too many drinks at the pub and have decided to stop for a nap on the way home LOL!

The papers are from the Clipart Fairy Boy Trendz 1 collection. I coloured the image in Photoshop, and added the sky background which was also created in Photoshop. The sentiment is a freebie from Create with TLC, the buttons are made using a Marianne Creatables die and the strip of jute and jute string came from Aldi!


Don't forgot to check out the rest of the DT inspiration at the Teddy Bo Challenge Blog and look out for the freebie wordart tomorrow on Wordy Wednesday. There is another fab tutorial coming up on Thursday over at the Teddy Bo store and then all the goings on this week at Teddy Bo Towers in Fairytale Friday, a sneak peek at next weeks graphics on Saturday and something to get your imagination flowing on Mojo Mondays. There is never a dull moment at Teddy Bo and Co!

I am entering this card into the following challenges.

One Stitch At A Time - Anything Goes
Paper Sundaes - Your Favorite Colour Combination
Sentimental Sundays - must include a Sentiment - Anything Goes
Allsorts - #124 Feature a Bear
Fetch a Sketch  - Sketch

Saturday 8 October 2011

One (or two, or three) for the boys!

Today is a very special day as my 'baby' (the youngest of my two girls) will be celebrating her 21st birthday! 
Hope you have a fabulous day Meg!

Now onto today's cards, recently all I seem to have made is either Christmas or girlie cards, I was getting fed up with them and felt like a bit of a change, so today I have made a couple of male/boy cards with Printables from the Clipart Fairy.


The first two are made using the Over The Top - Teen Cool Dude printable. The set contains the boy sitting on the frame, some decoupage layers and circle sentiments, I cut out the main image, layered up the decoupage, added the circle sentiment, a button and grosgrain ribbon from stash, and then attached a tent card, cut to size to the back, easy peasy.


Then, to show that you are not limited to just one style of card with a printable, I used it again, with papers from the Boy Trendz 1 kit to make an easel card, I added the wording in the frame before printing, and used the circle sentiment as the stopper. Some brown grosgain ribbon, string and buttons from stash finished it off.


The second card is a little more grown up, the Over The Top,-You still got it set comes with both the version with the wording, (which I have used), and a version left blank so you can add your own message or personalisation. I decided to keep this one quite simple so after I had printed it out, and layered up the decoupage, I just added a couple of brads. I then attached the whole thing to a card blank leaving some of the card showing all around the edge, and trimmed the corners to follow the shape of the topper.


As cards for the male members of the family are never easy it is always useful to have a couple tucked away in your stash, and at only 50p per download, these are great value for money,
and quick and easy to put together.

I'm expecting quite a few visitors today, for Meg's birthday and then we are going out this evening for a meal with family and friends. I also imagine a few glasses of wine will be finding their way down my throat tonight, so I may be a litttle delicate in the morning!

Friday 7 October 2011

Polkadoodles Handmade Flowers challenge

This week at the Polkadoodles challenge blog Fliss has set the theme and she wants you to add some HANDMADE FLOWERS 
to your creation. These can be made by punching, die cutting, stamping, decoupage and so on - the choice is yours. There is also going to be a Polkadoodles stamp giveaway, so head over to the blog 
and check out the details.

For my card this week I have used the fabulous Pretty Sweet CD, I just love the yumminess of the papers and the sweet girls. I have made a scalloped circle tent card, and for my flowers I printed one of the paper designs from the CD onto both sides of a piece of paper and using the Marianne Creatables Chinese rose die cut out three roses, rolled them up and then brushed glue over the top and sprinkled with glitter. The swirl is also a Marianne Creatables die and ribbon is from stash.


The two circles are attached at the top with the bow, then I have added a concertina of card at the bottom between the two layers to give some dimension.. The panel for adding a  message is on the back.


Head over to the Polkadoodles blog and check out all the fabulous inspiration from the rest of the DT.
You have until Sunday 16th October noon GMT to get your entries in. Good luck xx

I am entering this card into the following challenges

Alphabet Challenge -  R = recipe - 1 image, 2 backing papers, 3 flowers
Glitter Geeks - flower power
Inspire Me Fridays - always anything goes
Crafts and Me - #55 use a digi
I Brake For Challenges  - Girl Power
Penny's Paper-Crafty -  #63 anything goes 

Thursday 6 October 2011

Grin and Bear It!

How many times have you had that said to you, or have maybe said it yourself to somebody  else, "you've just got to grin and bear it!" usually when people are having to do something unpleasant, well today it's all about cute, cute, cute!  Clipart Fairy has a range of ready to print cards called Grin and Bear It, in her store here featuring a cute little bear, lots of pink and flowers. If you read my previous post you would have seen the frilled squares, well today I have the Rocker and shaped card to show you.

You will need the starter set, with contains the rocker base, topper, circle sentiments and inserts, there is then a couple of add-on toppers you can buy separately.

For this card I have used Add-on 1, which contains two versions of the topper and decoupage, either ready to print, which is what I have used, or an editable version so that you can add your own sentiment or personalisation. I used Nellie Snellen Multi Frame die MFD020 to cut out the sentiment panel, the gingham ribbon, pearls and little 'made with love' charm are from MeiFlower and the beaded pin is from The Ribbon Girl.

My second card is the Grin and Bear it OTT 1 card.
I cut it out ready to add a tent card to the back of it, but then changed my mind and decided to use it as a topper instead. I printed two of the  papers from Yummy 2 (1 pink, 1 cream) directly onto card, then cut the pink one to 20cms square and the cream to 20 x 24cms, I scored and folded the cream card at 4cms, punched down the edge with a Martha Stewart border punch and then folded it around the pink card, added the ribbon and stuck it down, this gives me a large 20cm square card base with a fancy co-ordinating edge down the side. I attached the topper to the card using very sticky tape ( the red stuff) as I have curved the front of the topper so that it stands away from the card, and needed something that would hold it securely.


The sentiment was layered onto cream card which had been die cut with the same Nellie die as above, the swirl is a Marianne die, again cut from cream card. The ribbon, charm and pearls are all from MeiFlower, and the little rosebud is from my stash.

Back tomorrow with the new Polkadoodles challenge. See you then. xx