Tuesday 29 November 2011

Teddy Bo Tuesday - A White Christmas

Will we or won't we, that's the big question, will we have a White Christmas, probably not! I love snow when it's falling and fresh on the ground, but once it turns to ice or slush then I'm not so keen, but I would love to wake up on Christmas morning and see a beautiful snowy day outside my window.  I'm lucky enough not to have to leave the house on Christmas Day, my family come to me, (on the downside I do have to cook Christmas dinner for everyone  though!). It wouldn't be so nice for those that have to travel to relatives houses for their Christmas dinner if it was snowy or icy.

Anyway all this is leading me onto the Teddy Bo Challenge this week which is

A White Christmas

We would love to see your interpretation of this theme, and if you need a little help, pop over to the Teddy Bo Challenge Blog and take at look at the fabulous inspiration from the DT.

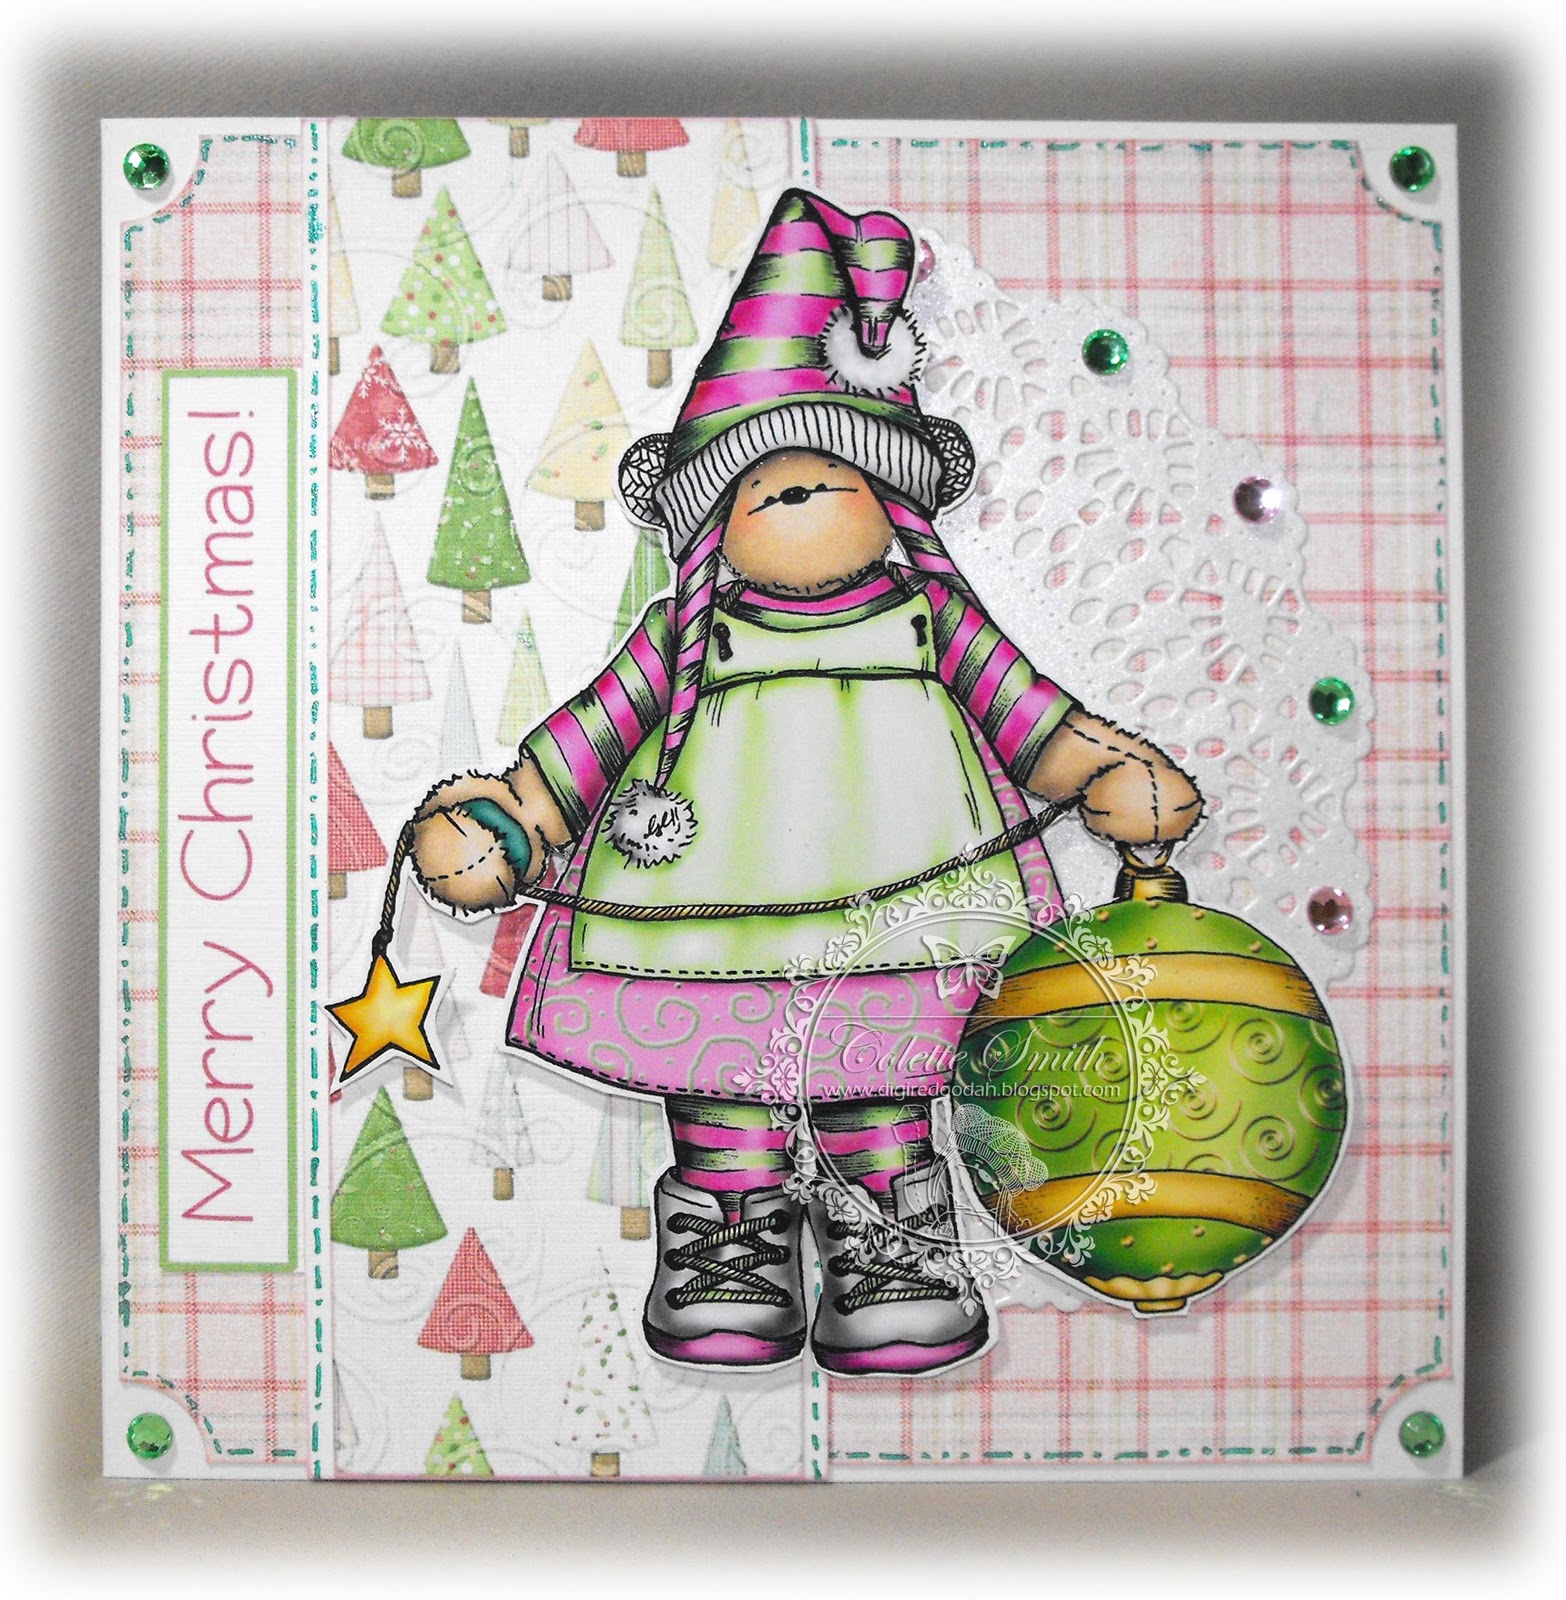
I have used one of this weeks new images, and also borrowed a hat from one of the other new releases, I'm sure they won't mind though LOL!


Image - TEDDYBO_157 Coloured in Photoshop
Hat borrowed from TEDDYBO_158 and made to fit with a bit of photoshop jiggery- pokery
Blue card base - Nitwits Frost'n'flakes
Ribbon - MeiFlower
Card shape - GoKreate die
La Rue Flourish - Memory Box die
Embossing folder - Papermania - Snowflakes
Lots of Glamour Dust

I found a beautiful poem by Alice E Chase, called Baby's First Christmas and used it inside my card.

I am entering this card into the following challenges

Cheerful Stamp Pad - "Who`s Wearing Santa`s Hat" 
Craft Your Passion - Tis the Season... (Anything Holiday or Winter related)
Daisy Doodles Creative Challenge - (must use digi) - Christmas
Forever Friends - must include animal -  White and Sparkles
Hooked on Crafts -Winter Wonderland
Karens Doodles - Non Traditional Christmas Colours
Ooh La La Creations -  Lots of Sparkle 


You have until Sunday 11th December Midnight GMT to get your entries into our challenge with a chance to win the TEDDY BO 10, a fabulous prize of ten Teddy Bo images of your choice.

From 1st December Nela, one of my Teddy Bo Teamies will be running an advent calendar on her blog,
each day there will be a new workshop with instructions for various items including packaging, table decorations, card shapes and more and on the 24th there will be candy. Check out the link in my sidebar.

.....And finally,  the Teddy Bo Tombola.
This week's winners, drawn once again by my daughter Meg are...........


Kirsty-Anne and Dizzy Di, if you could email me (putting Tombola in the subject line) with your contact details I will get your parcels in the post (click on view my complete profile for my email address.)

If you would like to try your luck in the tombola this week, then it's really easy, just leave a comment on this post containing the number you would like from the ones remaining.
1, 3, 5, 6, 8, 15
and if you are not sure what the tombola is all about check out the details here

Thanks for playing along and good luck!
Colette xx

Saturday 26 November 2011

Clipart Fairy Nature Boy

Four weeks today it's Christmas Eve, how scary is that?!!! I have friends and family who have bought all their Christmas pressies, have them wrapped and have written out their cards, but all I have so far is a couple of gifts. I was just about to type that next Saturday I am going out to do my Christmas shopping when I realised that I have a Clipart Fairy workshop that day, and of course crafting has to come first LOL! Thank goodness for internet shopping hehe!

Today I have two cards to show you using the Nature Boy Large Frame Kit, one for a boy and the other for a girl.

This large kit contains 28 Jpeg 12 x 12 papers; 1 frame with a transparent centre (so you can add things behind it) 1 frame with a white centre (so you can add things on it) the word art "Have an awesome day"The Nature Boy Super Frame, this Super Frame can be re-sized to whatever you want and the decoupage bits will always fit. Please note the nature boy only comes to you inside the frame.
PNG card base; 2 PNG inserts including 1 with a blank oval & 1 plain; 3 PNG circle sentiments for birthday & best wishes and all for only £2.65.


I printed out some of the papers from the kit onto card and then matted and layered them to make up my design. I used the super frame with decoupage for the front of card, and cut a slightly larger oval from one of the printed papers to mat it onto, I printed out the sentiment circle twice then added a plain blue circle with the 'awesome day' word art onto one of them. I inked around the edges of everything with a brown ink pad, and printed the designs for the inserts onto paper.

 I am entering this card into the following challenges.
Sassy Cheryl's - #91 Anything Goes
Make it Monday - always Anything Goes

~~~~~~~~~~~~~~~~~~~~~~~~~~~~~~~~~

There is a good variety of colours in the kit, including a bright pink so I thought I would show how versatile the kit is by making a girlie card too, I just added a girlie graphic, there are lots to choose from in the Clipart Fairy store, I chose a cute Butterfly Angel.


For my easel card I once again printed various papers onto card and used them to mat and layer my design. Using the frame in the kit as a guide I made up a pink version adding word art from Wendy's wordart 1 and the Butterfly Angel 3B. I aslo glittered around the oval and parts of the butterfly angel. I printed a sheet of pearl paper with  strips of plain orange and green from the kit, leaving part of it unprinted, and used this to die-cut the various parts of my flower. The flowers were made with a Die-namics Daisy Upsy Daisy die set and the swirl is from Sizzix flourishes and swirls set. I made up three little boxes for the inside, 1 decorative, 1 for the birthday sentiment and the other to write your message on. The stopper was cut with Martha Stewarts Deep Edge Punch Garden Trellis, and decorated with little coloured buttons from MeiFlower, which I thought picked up the spots in the backing papers.

I am entering this card into the following challenges.

Wags 'n Whiskers - Angel or Fairy
Fab 'n' Funky - #100 Happy Birthday
Flutterby Wednesdays - must include butterfly, fairy or angel - #181 Open
More Than Favors Wacky Wednesday  - #60 birthday
My Mum's Craft shop - #33 things with wings


If you still have lots of Christmas cards to make then check out the Clipart Fairy's 25% off Christmas Sale in both the Printables and Regular store and if you need a present for a Crafty Friend, why not give them a  Clipart Fairy Christmas Gift Voucher.

Friday 25 November 2011

Polkadoodles Italian Christmas and Stamps giveaway

Miria, our bellissima Italian teamie has set this weeks challenge:
An Italian Christmas
She wants to see Christmas projects made using the colours of the Italian flag, green, white and red.

It is also stashbox stamp week so the design team can use any rubber stamps from their stash and team it up with Polkadoodle products.

There is also a fabulous Polkadoodle Stamp giveaway.

I have used papers from Sundae of Seasons and Father Christmas from the Polkadoodles Christmas Fun Clear Stamp set. Image was coloured with Promarkers and I added glitter to his hat, trouser stripes and belt and Carole's soft stuff to his furry bits. The mats are made using X-Cut nested Bookplate dies, and I used a snowflake embossing folder on the white strip. Ribbon from MeiFlower.


Head over to the Polkadoodles blog and check out the rest of the 'bellissima' creations from my teamies.

All challenge entries must be in by Sunday 4th December Noon GMT 

Tuesday 22 November 2011

Teddy Bo Two-sday and Tombola!

Did you see what I did there, hehe! What I was trying to tell you with the silly title is that today you get not one, but two Teddy Bo Creations from me!

We are half way through the latest challenge...

Christmas but Red and Green must not be seen!


My first project is a card made using one of this weeks new images.

Image - TEDDYBEA_170 coloured in Photoshop
All papers - Frost N Flakes- Nitwits
Snowflake - Memory Box Die.
Ivory Ribbon and pretty button - MeiFlower
brads - stash

I am going to enter this card into the following challenges.

Forever Friends -  must include animal - Christmas is Coming
Make it Monday - always Anything Goes
Create Me Pink Challenges  #4  Use A Digi 
Crafty Emma -  #62 Snowflakes

I also decided to have a go at making a hanging ornament. I saw a few of these around blog land last Christmas and decided now was as good a time as any to have a try. It is made up of 20 circles of card, 5 of the ones through the middle contain the Teddy Bea image, the ones in between have a glittered die cut snowflake, with a sparkly gem in the centre and I have added a gem between each section. A big bow, beads and a beaded tassel finish it off.

Image - TEDDYBEA_165 Coloured in Photoshop
Papers - Various Nitwit Kits
Snowflake die - Marianne Creatables
Ribbon and Gems-MeiFlower
Tassel - Crafty Devils
Beads - stash

I am entering my bauble into the following challenges
Inspire Me Fridays - always anything goes
Winter Wonderland -must be Christmas -  any cute image

Don't forget to check out the new images in store this week.


and make sure you pop over to the challenge blog to feast your eyes upon all the fabulous inspiration from the design team this week.

Now onto the Teddy Bo Tombola.

This week's winners, drawn by my daughter Meg are...........


Marion82 and Jo, if you could email me (putting Tombola in the subject line) with your contact details I will get your parcels in the post (click on view my complete profile for my email address.)

If you would like to try your luck in the tombola this week, then it's really easy, just leave a comment on this post containing the number you would like from the ones remaining.
1, 3, 5, 6, 8, 9, 14, 15
and if you are not sure what the tombola is all about check out the details here

Thanks for playing along,
Colette xx

Saturday 19 November 2011

Clipart Fairy Snoozeville

Today I have two Snoozeville cards to show you, one is the ready to print kit, which works exactly as it says on the packet LOL!, you just print and put it together, adding you own stamp to the card with your embellishments, the second uses the interactive version. With the interactive version you get the same parts as the printable, plus 30 papers, and it's interactive because using your graphics programme you can change the size of all or any of the parts.


I have some friends who don't feel confident in their card designing abilities and don't have or know how to use graphics programmes, so they really love the printables, not only is the design done for you but they are quick and easy to make up and I always think it is handy to have some in, (even if you design your own cards), in case you need a card in a hurry.
The Snoozeville Large Frame printable kit costs 80p for which you get -  pdf and jpeg versions of the card base, topper and decoupage, and matching inserts (one editable to add your own wording and one containing wording) the finished card measures approximately 21 x 18cms so it's a good size.


I used gold glitter around the card base and oval, attached a couple of eyelets either side of the oval, threaded through and tied green and yellow string from MeiFlower, and added a couple of die cut shapes (spellbinders Ironworks Motifs) to the bottom corners.
The insert reads "but some habits are just too hard to break!"


On the other hand if you prefer to design your own card layouts then The Snoozeville kit is for you, it costs £2.65 and contains 30 Jpeg 12 x 12 papers; 1 frame with a transparent centre (so you can add things behind it) 1 frame with a white centre (so you can add things on it)  the word arts, The Snoozing Man Super Frame, this Super Frame can be re-sized to whatever you want and the decoupage bits will always fit. Please note the snoozing man only comes to you inside the frame. PNG card base; 3 PNG inserts including 1 with an image, 1 with a blank oval & 1 plain, so plenty of choices when designing your card.

I re-sized the card base to fill an A4 sheet and used it as a portrait card, I sized the oval frame topper to fit my card front, chose the blank oval which I made smaller and then added the appropriate word art to each. I also printed out a couple of the papers from the kit, which I used to decorate the front of the card base, I added Grosgrain ribbon from MeiFlower, around the strip of card before attaching to the card with foam pads. Both ovals were glittered and then I added brads (from Stash) and metallic brown string also from MeiFlower, to the smaller oval and a large brad to the main oval which I used to hold the hanging sentiment panel in place. The large oval was fixed to the card with foam pads, the smaller hangs free.


I personally like to print a design onto the reverse of my card, to give the inside some interest, I also used matching papers to make up a message panel.

So there you have it Ready to Print or Interactive, what's your preference?

If you fancy some Clipart Fairy freebie papers, then pop over to her blog, there are a couple here, and here.

Friday 18 November 2011

Polkadoodles Shaped Christmas Card

Ruth has set the theme for this weeks challenge on the Polkadoodles blog and she wants to see cards or projects that are
Christmassy and Shaped (no squares or rectangles allowed).

This time around I used the penguin from Magical Winter 1 CD, printed him out on the right hand side of A4 card, folded the card so that his flipper touched the fold, then cut through two layers at once, (except for where his flipper touched the fold and a couple of centimetres at the bottom). I decoupaged his flippers and scarf, adding some pompom trim at the bottom of the scarf and tucking a sentiment panel under his flipper.


Look out for Nikky on Create and Craft this coming week ,I think she's on Wednesday 23rd, it will be the first showing of her fab new CD Pretty Tuff, which is a boy version of Pretty Sweet, there is some fabulous images and digi stamps on their as well as lots of lush papers. I've done some samples, see if you can recognise them!

 Pop over to the Polkadoodles blog and check out the rest of the fabulous Shaped Christmas inspiration from my teamies.

You have until 27th November Noon GMT to enter the challenge, looking forward to seeing what you come up with.

Tuesday 15 November 2011

Teddy Bo Tuesday and Tombola!

It's time for a new challenge over on the Teddy Bo blog this week and this time around Team B are hosting. Their challenge is
Christmas but Red and Green must not be seen!

We want to see all your Christmassy creations but without the traditional red and green, if you pop over to the challenge blog you can find all the details and have a look at the fabulous creations by the rest of my teamies.

For my card I chose to go with.......... Lilac and Turquoise LOL!, you should have known!


I have used TEDDYBEA_017 coloured in Photoshop and sitting
on a chair which is one of this weeks new graphics.
Papers, present and word art are from Nitwits Still Joyful Collection
Poinsettia and Circle dies are Marianne Creatables.
I have embroidered a pattern around the image using turquoise metallic thread and lilac beads.


Check out what's new in store


~~~~~~~~~~~~~~~~~~~~~~~~~~~~~~~~~~~~~~~~~~~~~~

Meg drew the winners for this weeks Tombola and they are


So June and Maritha if you could contact me with your details (email address in profile) putting Tombola Winner in the subject line I will get your parcels out to you as soon as possible.

If you would like to try your luck in the tombola this week, then it's really easy, just leave a comment on this post containing the number you would like from the ones remaining.
1, 3, 5, 6, 8, 9, 12, 13, 14, 15
and if you are not sure what the tombola is all about check out the details here

You have until Sunday 27th November Midnight to enter the challenge and be in with a chance of winning the Teddy Bo 10, that's right you get to choose 10 fabulous digital images from the Teddy Bo and Co store. The two runners up each win one digital image of their choice.

Monday 14 November 2011

Cutie Pie Challenge

Hi Everyone, just a quickie from me, the challenge starting today over on the Cutie Pie blog is
Bears
and one of the sponsors is Teddy Bo and Co
who is offering a prize of 3 digi stamps from the ones the DT have used,

the other prize is from Crafty Emma's store 
and is a £10 voucher not inc. postage.

Hazel who is on the Cutie Pie DT as well as the Teddy Bo DT asked around at the towers to see if anyone would like to guest design and a few of us took her up on it, so if you pop over to the Cutie Pie challenge blog you can see exactly what the Teddy Bo and Cutie Pie girls came up with.


For my card I used -
Skating Bea digi-stamp – teddybo.com
Papers – nitwitscollections.com – Comfort and Joy
Dies – X-cut Nesting  dies- Ornate Frame and Bookplate
Gems, ribbon and jingle bells – meiflower.co.uk


The challenge runs for two weeks so there is plenty of time to get your entries in and with such fabulous prizes on offer what are you waiting for!
Good Luck!

Saturday 12 November 2011

Clipart Fairy Duo

Today I've got two Clipart Fairy cards to show you, one of them uses a kit, and the other papers and clipart.


For this card I used the 'This Much Kit' which is only £2 and contains 14 Jpeg 12 x 12 papers; 1 frame with a transparent centre (so you can add things behind it) 1 frame with a white centre (so you can add things on it) 1 plate stopper in case you fancy making an easel card or could be used as a tag; 3 curved word arts and a From: word art and the Girl in a Super Frame, this Super Frame can be re-sized to whatever you want and the decoupage bits will always fit.

I made a tall tent fold card, and cut a piece from the front, I then added a scalloped border and the oval frame with decoupaged image to the bottom of the card. When the card is standing, the front rests on the base of the oval and the inside of the card can be seen behind it.
I used a Martha Stewart punch for the scalloped border, glamour dusted around the oval frame and on the girls hat and skirt, and then finished it off with  polka dot ribbon and green gems from MeiFlower.

~~~~~~~~~~~~~~~~~~~~~~~~~~~~~~~~~~~~~~~~~

My second card uses papers from the Simply Christmas Papers 4 pack, another bargain at 80p for 13 12x12 jpeg papers, a lot of these papers do not have a Christmas theme so could be used all year round. There are another three packs available, all the same price and containing the same amount of papers, but each has a different range of colours. The image comes from the Colour Frosty Longstockings set, you get five snowmen each in a different colour for only 65p.


I layered up and matted various papers from the kit onto a six inch square card blank, I used a Martha Stewart punch for the snowflakes which have been punched from silver foil card, sprayed with spray mount and liberally sprinkled with silver glitter. The sentiment was computer generated and the cute little buttons I got from MeiFlower at the NEC last weekend.

~~~~~~~~~~~~~~~~~~~~~~~~~~~~~~~~~~~~~~~~~

Later today I'm off to my local garden centre to buy some fish. As we all suffer from allergies here, we don't have pets with fur or feathers, so we go for those with scales. Over the years we have had both tropical and cold water, and when the last of our goldfish, went swimming off to that great fish tank in the sky recently I decided that I would like to go tropical again. A couple of weeks ago we cleaned out the tank, added a heater and set it all up, so we are now ready to go and get some new residents. I think I'm just going to get a load of Neon Tetras as I love the way their bright colours catch your eye as the dart about the tank.

Have a lovely weekend!
Colette xx


Friday 11 November 2011

Polkadoodles Swirls, Pearls and Pretty Pastels

This weeks challenge over on the Polkadoodles blog has been set by Daniele, who wants to see cards or projects that contain.
Pearls, Swirls and Pretty Pastels
There is going to be a fabulous Letraset prize too  for one lucky entrant.

For this weeks card I have used papers, image and sentiment from the Pretty Sweet CD. I also used X-cut scalloped rectangle dies, a Bazzill Jewel template for the swirls, and pearls from MeiFlower.


Head over to the Polkadoodles challenge blog, check out the Fabulous Letraset Giveaway and the fantastic inspiration from the rest of my teamies.

You have until Sunday 20th November Noon GMT to show us your creations containing swirls and pearls, looking forward to seeing them.

Tuesday 8 November 2011

Teddy Bo Tuesday, Tombola and a new baby!

Well he's finally arrived, Sunday evening at 4 minutes past seven, five days late, but when he decided it was time he didn't hang around, just three hours from the first contraction to the birth, weighed in at 7lb 15ozs.
Let me introduce you to my new grandson Charlie.


The first picture was taken in the hospital, lighting was pretty grotty and everything came out quite red. Second one was taken when he got home.

~~~~~~~~~~~~~~~~~~~~~~~~~~~

We are half way through our pastel challenge over on the Teddy Bo blog, and I have just about managed to fit in a card between baby being born sunday evening and running around today to make sure everything was ready for him coming home. Although  I haven't had time to do the inside yet.

I have used TEDDYBEA_165
Coloured in Photoshop
Gems - MeiFlower


I drew the swirl pattern on the dress and decorated the bauble in Photoshop and tried to make her boots look silver, as they reminded me of a pair of boots my daughter Meg once had. She gets her shoes specially made through the hospital, as she can't wear normal shoes due to the shape and size of her feet, (she's now 21 and Will (6) has bigger feet than her). We used to let her pick her own colour and design, but always tried to guide her towards black, white or some other sensible colour, but one year out of the blue she asked for silver and the bloke at the hospital managed to get her some made in silver leather,it looked like her feet were wrapped in tin foil.I hated them as she only ever had one pair at a time and she had to wear them for school and everything, but she loved them and that was all that really mattered.


Meg Disneyland Paris 2002
~~~~~~~~~~~~~~~~~~~~~~~~~~~~~~~~~~~~~~~~~~~~~~~~~~~~~~~~~~~~~~~~~~


You still have until Sunday 14th November midnight GMT to get your entries in and the prize is a fabulous ten Teddy Bo and Co digi images of the winners choice.
Pop over to the Teddy Bo Challenge blog and check out the rest of the inspiration from my fab teamies!

Now onto this weeks Tombola winners
the two lucky peeps randomly picked by my daughter Meg are
Karen who wanted no.2 and Maria who chose no.4


Ladies if you could contact me with your address details I will get your prizes out to you, you'll find my email address in my profile. Please put Tombola in the subject line.

Still six more weeks of prizes so don't forget to leave a comment and add your lucky number from the selection below to have a chance of being picked next week.

1, 3, 5, 6, 8, 9, 10, 11, 12, 13, 14, 15

Good luck!

I'm entering my card into the following challenges
Paper Shelter Challenge -  #38 Christmas fun
Pixie Cottage - Christmas and/or sketch
Sweet 'n' Sassy - use a digi -Christmas/holiday theme
Daisy Doodles Creative Challenge -  (must use digi) - Anything goes with a Digi
Forever Friends -  must include animal - Bling Bling
Make it Monday - always Anything Goes

Saturday 5 November 2011

Tree-Mendous!

I'm off to Birmingham today to the HobbyCraft show at the NEC, I'm hoping to catch up with Nikky (Polkadoodles) Mei from MeiFlower and Claire, one of my fellow teamies on the Teddy Bo Team, can't wait! On top of that I get to buy some new craft goodies WooHoo!

But first I have a card to show you, this time using the Tree-Mendous Christmas kit from the Clipart Fairy, £2.00 gets you 13 Jpeg 12 x 12 papers (none of the papers have a Christmas theme which makes them perfect for all year round) 1 frame with a transparent centre (so you can add things behind it) 1 frame with a white centre (so you can add things on it)  2 buntings, one blank; PNG base shape; PNG base insert shape both with and without the white oval and with and without the image; 'Christmas Dressed Up' in a Super Frame, this Super Frame can be re-sized to whatever you want and the decoupage bits will always fit.

I'm lovin' all the bright colours and quirky graphics in her kits at the moment, they really appeal to me.


I used various bits of the kit to make a gate-fold card with the main image inside behind the doors. the front 'doors' I made from papers in the kit. I left the front quite plain because everything is going on inside the card. Inside there is lots of glittering, although it doesn't show up very well in the pics. The red part of the baubles are made with my new Memory Box die, it's quite delicate once it's cut. I sprayed it with adhesive and sprinkled with red glitter then added gems to the centres of the snowflakes. I glued it onto white card and then cut around to get the contrasting base. I cut out the bunting, added some green metallic cord and shaped it so that it looks like the girl is holding it up, I added contrasting gems to each section.
The ribbon, gems and metallic cord are all from MeiFlower.

Have a lovely weekend and if you're lucky enough to be going to Birmingham then have fun and spend lots!

I'm entering this card into the following challenges

Crafty Hazelnut's Christmas -  must be Christmas -  #45 Bright Colours and/or Sparkle
Card Makin' Mamas - die cuts
Inspire Me Fridays - always anything goes
Sweet n' Sassy Digi Challenge -  must use digi - Christmas/holiday theme

Friday 4 November 2011

Polkadoodles Shaped Card challenge

This weeks Polkadoodle challenge theme has been chosen by Fliss and she wants to see
Shaped Cards - for any occasion (no squares or rectangles allowed).

 I love making shaped cards, and for this challenge chose to make one of my trifold shapes. I have used the Pretty Sweet CD for all the papers and the image. The little girl has been coloured in Photoshop, and  I have paper pieced her clothes with more papers from the CD. The sentiment is also from the same CD. The scalloped oval frame was cut using a GoKreate die and a nestie, the scalloped border is a Marianne Creatables die and the lilac oval has been embossed with a cuttlebug daisies folder.The gems and ribbon are from MeiFlower the flowers, and beaded pin are from stash.


I have used my favourite colours of lilac and turquoise/blue.

Don't forget to head over to the Polkadoodles Challenge Blog and check out all the fabulous inspiration from my fellow teamies.
You have until Sunday 13th November Noon GMT to get your entries in, we look forwarding to see all your wonderful shaped creations.

I am entering this card into the following challenges

Charisma Cardz -  Cutesy Project
Pixie Dust Studio - Paper Piecing
Crafty Ribbons -  BINGO* (punch/dies - flowers - ribbon)
Little Darlings Challenges - #10 not square